Showing posts with label Late Night Photoshoot. Show all posts

Friday, January 27, 2012

Indianapolis XLVI

1.6 seconds, f/10, ISO 200, 12mm using Tokina's 12-24mm f/4

People, it's Super Bowl 46 time in Indianapolis.  You know what that means - photo opportunity! We are talking about tons of people, challenging lighting and LOTS of color and action.  Picture Perfecto. 

I headed down the day before the formal activities started to try to capture some views before the party begins.  The challenge was that although it's winter the weather is more late fall like.  Cold and rainy, and it had been raining most of the day.  It just so happened as soon as I parked it stopped raining.  That gave me an opportunity to walk around and shoot some images around Monument Circle which is in the core of Indianapolis.

This time I wanted to capture LOTS of the image so I brought my Tokina AT-X 107 AF DX Fisheye – 10-17mm f/3.5-4.5 and a Tokina AF 12-24mm f/4 AT-X Pro DX.  I am a Nikon guy, and prefer to use Nikkor lenses exclusively.  However, I've found that Tokina lenses are as good as my Nikkor lenses.  The only problem is that I don't shoot wide angle that much so I figured this was going to be fun.

2 seconds, f/7, ISO 200, 11.5mm using Tokina's 10-17mm f/3.5-4.5

It was pretty dark outside, and very overcast, so light reflected off the low lying clouds.  This made for some really cool effects when long exposures was done.  For these shoots I simply used my Manfrotto tripod.  I set my Nikon D300s to the lowest ISO so I could minimize as much noise as possible.  Therefore all shots were set at ISO 200.  I also shot all images at F/7 or smaller.  I wanted to get long DOF & light starbursts. 

There were lots of people downtown, but not enough for me to be a bother while standing on the edge of the road with a tripod.  It was fun and the vibe of the city was growing.  You could tell a BIG party was coming. 

I only shot about 50 images, about 50 % with the fisheye and the rest with the wide angle.  Both lens focus smartly and are tack sharp.   The also focus very well in low light, which tends to be a large percentage of my shots.  Bottomline, great lenses.  When I go back out to shoot the event as a run up to the Super Bowl, I will definitely bring these lenses.

0.4 seconds, f/7.1, ISO 200, 10mm using Tokina's 10-17mm f/3.5-4.5

After action comments:

  • On weather like this keep a rag or small towel in your bag.  Even though it was not raining buckets it did start to sprinkle, and I didn't have anything handy to clean off my lens.
  • Watch out for blowing out portions of the image.  These were fairly long exposures and there was some pretty bright lights.  I had several images that had significant areas blown out.  Post processing can only correct areas of an image if there are pixels.  Check your histogram.
  • If you want starbursts keep your aperture at f/9 or higher
  • Take advantage of wet pavement.  Try to capture unusual light patterns or shadows. It's pretty cool.

Sunday, September 11, 2011

Red Bull Indianapolis GP Shoot

It's crowded downtown
The Indianapolis Motor Speedway hosts the annual Red Bull Indianapolis Grand Prix.  This is a multi-day motorcycle-a-rama concluding with the Indianapolis GP race.  What I enjoy and have done for the past 2 years is head down to downtown Indianapolis the Saturday night before the race.  It’s crazy downtown.  The city streets around the Monument Circle are PACKED with every type of motorcycle imaginable from all over the USA. 

It’s an opportunity for the motorcyclist to show off and take in all the sights.  Many of the city streets are blocked off and downtown becomes a big party.  Indianapolis does these types of things really well.  All the clubs were hopping & open spaces turned into open air clubs / venues.  Needless to say a photographer’s dream.  The challenge is that most activities really start hopping after dark. 

The setting calls for lightning fast glass, high ISO & regularly changing white balance.  It’s a real balance to get enough speed to minimize motion blur, unless of course if that’s what the scene calls for.

Is the the proper way to ride a crotch rocket?

One wheeled wonder

Also, this year I went to the XDL Championship Series to start off my photoshoot.  This is a series of extreme motorcycle tricks / maneuvers on a very short stretch of road.  In Indianapolis they block off Walnut Street between Meridian and Pennsylvania and line the side of the street with bleachers.  On a very short stretch of road highly qualified riders do their timed series of maneuvers.  Amazing.

All shots were taken with a Nikon D300s and either my AF-S Nikkor 24-70mm f/2.8G ED or AF-S Nikkor 35mm f/1.8G.  I chose the 35mm over my f/1.4 50mm prime simply because I wanted a smaller focal length for my DX sensor.  In hindsight I probably should have used the f/1.4 in some settings.  All WB was preset using a grey card, which became a bit of a pain with all the changing lighting, so I switched to shade or cloud preset.  Speeds were normally in the 1/50 or faster.  Basically the fastest I could get.  I sacrificed ISO for speed.  All shots were at ISO 1600 or higher.  I did get away with ISO 400 during most of the XDL Championship shoot because it was still somewhat bright outside.  F-stop was almost always at the widest aperture, so I did sacrifice some deep DOF.  Again, a trade-off. 

Checking out the sights

Getting quite a few stares
Once again I find shooting at night tons of fun.  Although it’s technically more challenging it creates a mood and color range you simply don’t get during the day.  Especially when you have something as exciting as the pre-race downtown party for the Red Bull GP.

Monday, September 5, 2011

San Francisco Fire & Night Workshop with Chris Marquardt

San Francisco skyline from Treasure Island at sunset
I just completed a photo workshop and series of photowalks with photographer, Chris Marquardt.  The workshop was in San Francisco and focused on street photography, after dark fire dancing photography and after dark city scenes around San Francisco.  I’ve followed Chris’s work, website & podcasts and learned about the workshop from one of his podcasts.  Since the focus of the workshop was photography after dark and street scenes I thought it would be enjoyable and a great learning opportunity. 
Chris Marquardt interacting with street art
I was right about the workshop.  It covered several areas I enjoy shooting, but I have to admit it was humbling. Chris knows his stuff and it highlights how much I have to learn and develop my photographic eye.
I arrived late on Thursday and met up with the workshop participants at the end of their introductory get together dinner.  I’d say over ¾ of the 12 participants had either worked with or been on a previous Marquardt workshop.  Therefore, a number of participants already knew each other.  I figured that would make for a very interactive experience.  Most people were starting to call it an evening, but I got to meet most of the photographers, and chat them up a bit.
The workshop started officially at noon on Friday so I got up early and walked around San Francisco for about 4 hours during rush hour shooting the day unfolding.  Got lots of the standard SF tourist shots of cable cars, city scenes, Chinatown, etc.  The shooting conditions were great since the light was muted by the typical SF weather. 
We then met up and headed to Oakland for start the workshop at the Oakland Warehouse base for the Department of Spontaneous Combustion.  This is a live-in artist colony focusing on industrial metal sculptures along with sculptures that spew fire.  A very unusual mix.  The location is a non-descript warehouse in a rundown part of Oakland.  Lots of really cool equipment and sculptures in the warehouse to shoot.  We spent about 5 hours talking about all things photography focusing on the technical side of photography (versus composition).  The key learning experience for me was to use a grey card to check and set exposure.  In the past I used a grey card only to set white balance.  Also, Chris is big into manual shooting so the grey card is very important.
Stop action fire dancing

Double loops of fire

Grinding away

Playing with fire
When the night came we spent about 2 hours shooting 2 fire dancers.  For those who are uninformed, like me, a fire dancer uses various props that are lit on fire, i.e. a long staff with material (Teflon) on the end that is lit on fire.  The staff is spun around in various ways to produce a really interesting light show.  The equivalent of a ball and chain where the ball was on fire was also used.  The artists were quite skilled, and after with long exposures the images are amazing.  When the exposure is set correctly the fire looks like it’s alive.  I’ve never photographed fire before, so it was a challenge.  Luckily, Chris was there to lend advice.  All my images were shot with either an AF-S Nikkor 35mm f/1.8G or my AF-SNikkor 24-70mm f/2.8G ED.  Even with my fastest glass I used my tripod, ISO at 1600-3200, and most shots were in the 1 second range.  Lots of tasty motion blur with the fire dancers, which is what we wanted.
Day 2 started at 1pm, so once again I had a chance to go out before the workshop.  I walked down to the Ferry Building about 20 minutes from the hotel.  There was a huge street fair and farmers market going on.  It was a people-a-rama.  A photo rich environment from the homeless, beggars, artist, pretty people, and just folk.  Great fun.  I shot everything.  I then made my way back to the hotel to change my kit and then headed to the Embarcadero YMCA for a workshop on both street photography and after dark shooting.  I have done lots night photography so it was nice to hear that I wasn’t a complete idiot.  However, I still wanted to practice my skills.  The street photography part is something I want to do more of.  The key for street photography is either to blend in and capture the scene or get REAL close and shoot people.  We went for the close portrait work on the street. 
The key in late night photography is to take your time, adjust your ISO last and experiment / adjust your white balance.  Chris stressed you should focus on setting your WB to the temperature setting and adjust Kelvin.  As you might suspect even when shooting in RAW, NEVER use the automatic white balance setting.  The key on street scenes is placement, and capture the environment.  If you are going to shoot people then interact and get close.  Ask your subject if you can shoot their picture and then take shots from multiple angles.  Think of the person on the street that you are shooting as your model and watch for lighting, shadows and expression.  Getting a complete stranger to let you take their image is challenging.  Some of our workshop members were amazing at it.  I’m a noobie. 
After the workshop portion of the day we boarded a bus and hit a number of city locations.   For the street photography component of the night we paired off.  We visited a food festival in the Mission District.  Tons of people and lots to shoot.  After shooting street scenes for about 2 hours, we reboarded the bus and went across to Treasury Island and shot the skyline and Bay Bridge.  It was foggy, windy and cold.  It really was a challenging shooting environment.  I brought a Silk UFS-F740 Lightweight Tripod which was needed due to low light, but I still had lots of camera shake due to the wind.  After about an hour we boarded the bus and headed for a spot across from the Golden Gate Bridge to try our hand at a typical tourist image.  The first of the two locations to view the Golden Gate Bridge was a bust due to fog, but the second was amazing because the fog was moving out and it gave us some amazing scenes of the bridge and city.

Mexican heritage at the food festival in the Mission District

Street portrait at first reluctant to get photographed

Street portrait in the Mission District
All shots in the Mission District were with an AF-S DX Nikkor18-200mm f/3.5-5.6G ED VR II lens, ISO at 400-800, speed 1/100 - 1/250 second and white balance set at cloudy.  All of the shots after dark were with my 24-70mm f/2.8 lens, camera set to manual, White Balance varied throughout the evening to get different temperature effects, ISO was ranged based upon the shutter speed I wanted varying from 200 to 1600.  I also adjusted my speed through the shoot.  Basically I was experimenting.   

Golden Gate Bridge in the fog
We got back to the hotel really late, but it was great.  I contemplated going back out on the streets, but decided to crash.
Day 3 was earlier, so I didn’t go out before the workshop.  We met up at the Women’s Building in the Mission District.  We talked primarily about composition of street photography and several technical aspects.  It was amazing to see some of the images Chris had brought to discuss composition of the street, primarily Vivian Maier and Henri Bresson.  If you don’t know the story of Vivian Maier then I would encourage you to check her out…amazing.

Watching life go by

During the 3rd day we went out on the street and shot people again.  Also we had a chance to shoot each other in both a comical and a serious setting.  It was fun to see how everyone captured each other.  I rarely see myself on the other side of the camera so it was fun.  After the workshop was over we took a group photo, exchanged emails and wished each other good luck.  Lots of really great photographers all of who I would enjoy going back out with again.
Finally, after the day’s workshop was over I got back to my hotel, again changed out my kit for another romp on the streets and headed back out.  I walked down Market Street and then back to the Mission District.  There I got lots of shots of graffiti, people interacting with others, tourist, homeless, you name it.  Life in the big city.  I ended out being out for about 5 hours and got back at my hotel well after dark, finally calling it a day.

Street Rapper along Market Street

Mission District graffiti

Mission District graffiti
Bottomline, I had a great time.  I learned a great deal and met some good photographers.  Chris was an excellent workshop leader and host and he was able to impart a good deal of photographic wisdom on his charges.  I will definitely do something like this again.
A few tips / comments:
·         When traveling plan your camera kit carefully.  This time I packed just right primarily because I wanted to get everything in one bag.  I brought my 35mm f/1.8G prime, a 24-70mm f/2.8G, an 18-200mm F/3.5-5.6G, and finally a Tokina 12-24mm f/4 wide angle.  Also, 1 SB-600 speedlight (which I probably could have left behind), one camera body, plenty of CF & SD cards and the Silk tripod mentioned earlier.  I really didn’t want to take too much or leave something important at home.  I planned my kit specifically for what I was going to shoot.
·         One tip Chris shared with me on the bus, “don’t use clear filters on your lens”.  This is another piece of glass that light needs to go through and even high end filters can impact the amount of light going through your lens.  The only time to use clear filters is in dusty, sandy or salt water environments.   Also, always use your lens hood.  This provides lots of protection to your lens, and much more than a clear filter.
·       When shooting people in the street, be brave and ask if you can photograph them.  I was amazed that almost everyone agreed.  OK, a few thought it was weird and said no, but more than 50% said “sure”.  Talk to them, and shoot from various angles.  Get their contact information and remember to send them copies.
·       If you are doing a workshop especially in a different city, then spend every waking hour talking about or taking photographs.  I could have slept in or hit some of the tourist sites during non-workshop times, but I was there to take photos, so every waking our I was either working on the photos or taking photos.
·         Bring a backup hard drive.  I did this and every night I loaded my images onto my computer and also onto the backup hard drive.  I didn’t want to lose any of my shots.

Sunday, May 29, 2011

Night Shoot at the Indianapolis 500


Last night a few local photographers and I went to the Indianapolis Speedway to shoot some of the late evening activities the night before the Indianapolis 500.  Traditionally a fusion of alcohol, bodies, smells, colors, and sounds.  In other words, a photo rich environment.  

With my after dark photo experience I figured this couldn’t be too challenging.  I was wrong. 

First, I brought too much kit.  I really didn’t need to bring my Tokina SD 12-24mm f/4 DX lens and my tripod.  I also brought extra batteries for my Nikon SB-600 flash which was just added weight.  Secondly, the lighting was really crazy.  It was pitch black outside, but the location had all types of mixed lighting from the streetlights, lights at the track, lights from the vendor’s booths, etc.  Everything was mixed lighting and it was different every 5-10 yards.

The tripod was really not needed because there were so many people a tripod was not practical.  Also with all the people moving around any long exposure work would have been a motion-blur-a-rama.  I stuck to my Nikkor 24-70mm f/2.8 and my Nikkor 50mm f/1.4 lenses because I needed the wide aperture.  That’s why I didn’t use the Tokina lens.  Too slow for most of the shots.

What I did was set my camera to aperture priority, f/stop between the maximum lens aperture and up to f/8 to get good DOF.  And I hate to admit it, but I used auto-ISO.  Please don’t hate me.  I tried to keep the ISO as low as possible at first, but really didn’t have much luck.  I also used my flash for about ½ the shoot when shooting up close.  The problem with flash photography in a setting like last night is there are always people that just don’t want to be photographed.  Go figure! And combine that with alcohol, and, well you know how that can turn out.  No flash equals more incognito.  

Anyway, it was a good time hanging with a few local photographers.  I ended up focusing more on capturing the moment versus getting crazy good images.  A good decision.

Sunday, May 8, 2011

City Shooter


Shooting a city’s skyline offers a photo rich environment.  I live in Indianapolis, so I regularly use the downtown as a subject of, or backdrop for my photoshoots.  Not a huge downtown, but still a solid photo subject.  Since I do lots of nighttime photography I often capture downtown Indianapolis after dark.  Many will agree cities take on a different look and richness of color at night.  Most major cities are over photographed, so during the day I’ll try to do something different.  I will shoot with a fisheye lens, a composite panorama, or with brooding clouds.  Anything to get a different look.

When I shoot a skyline or cityscape at night and day I always us a small aperture as I want a deep depth of field.  Normally, F/9 or smaller.  This also gives you much wider selection of lens to choose from.  Also, use a wide angle lens.  I almost always shoot cities at 28mm or wider.

At night an aperture of F/9 or smaller creates starbursts on strong light sources which I enjoy.  Bring your tripod because it’s needed at night, and I use an electronic trigger to limit camera shake.  I set the camera to aperture priority and set the ISO as low as possible to minimize noise.  I allow my camera to set the shutter speed while in aperture priority.  Exposure often end up in the 30+ second range.  If I’m not getting the look wanted I’ll adjust the exposure compensation.  That’s about it.

At day, there is nothing special to it.  On a bright day I keep my aperture as small as possible and almost always handhold unless I’m shooting series for a panorama which I stitch in Photoshop CS5.  As noted above keep your aperture as small as possible to get the depth of field you want, and set your camera to aperture priority.  Now go out and shoot your city.

Sunday, March 13, 2011

Nighttime Photography Preparation Basics

One of my favorite photo environments is shooting at night. Even the busiest locations takes on a completely different “feel” and “mood” after the sun goes down. Also, colors unseen during the day come alive at night.

However, I’ve learned after many nighttime photoshoots you need to prepare differently and take different kit versus a daytime shoot. I wanted to share my normal routine and kit. As always this is my experience only. Others more or less accomplished may have completely different advice.

Basic tips:

Plan out your shoot. I think this is the number one “to do”. Get a feel of where you want to go in advance. Walk around an area at night a couple of days before your shoot if possible. I’ve been to some areas during the day that look A-OK, but at night just aren’t safe. Also, I’ve been to places (i.e. back alleys) during the day that look great, but at night they have huge spot lights on, that ruin the mood.

Dress appropriately. Sounds silly to point this out, but I can’t tell you the number of times I’ve been out at night ready to go and wished I had a jacket, or wished I hadn’t lugged a coat,

Don’t go where you’re not supposed to go. I’ve had friends, and have been personally tempted to get into abandoned buildings or areas blocked by fences. My credo is don’t do it. Personally, I just don’t want the hassle of dealing with authorities or a crazy owner if I end up someplace I’m not supposed to go.

Don’t take too much kit. Again, sounds basic but if you are like me and go out for 3-5 hours at night you’ll kick yourself for stuffing your backpack with gear you don’t need. Go as light as possible.

Take the right camera kit. Requirements at night are completely different than daytime. Plan out what you need to take. More on this below.

Tell someone where you are going, and check-in if you’ve agreed to do so. Not an issue if you are doing the shoot in your neighborhood, but if you are going city crawling like I do, its best if you someone know where you are going.

Go with another photographer or a friend versus going alone. Again, not a major drama if you are just around the neighborhood, but if you are going someplace new or away from your comfort zone take someone to watch your back. Personally, I don’t do this enough. I know this sounds paranoid, but I would prefer spending my time enjoying photography, versus looking over my shoulder.

Take minimal personal items with you. When I go out at night I bring some cash, my ID and a credit card. I leave my wallet at home.

Know what the weather. Again sounds silly, but it’s important. As an example, if you are taking city skyline shots and it’s really hazy, the light from the city will reflect off the haze when using long exposures. Doesn’t look good. Also, nothing worse than going out and calling it quits because it starts to rain.

Know your equipment. Some kit just doesn’t work well at night, and low / no light settings is no time to be fumbling with your camera to find out where a button or setting is.

Bring your fastest lenses. Any lens will work, but the faster your lens the more options you will have. I never bring anything slower than F/2.8.

Take the clear filters off your lenses. Unless you have very high quality, expensive, filters take them off. I know this is like driving without a seatbelt, but I find the filter causes ghosting on your images around strong light sources.

Kit to bring:

Again, this is a personal decision based upon your comfort level and what type of kit you have. The following is what I find is the most useable.

Lenses – I normally bring only 2, a medium zoom & a fast prime. My personal favorites are my Nikkor 24-70mm F/2.8 & my Nikkor 50mm F/1.4. Sometimes I’ll switch my 50mm for a 60mm F/2.8 Micro, or a 35mm F/1.8. Leave your long lenses at home, in my opinion.

Camera – take only one, and take your best. I have several cameras and have occasionally brought 2, but I always find it’s just a pain. When I say “your best”, I mean the one that has the best image quality at high ISO settings. I normally shoot on a tripod so this isn’t really an issue, but if you want to do any hand held images you will need high ISO.

Tripod – take it. Also, if you have one with a shoulder strap, use it. I shoot almost all of my night images with a tripod, so I can set my ISO to its lowest setting and my aperture to F/9 or higher. If you don’t have a tripod, invest in a good one.

Flashlight – bring one that you can put in your pocket. Something better than a penlight you have on your key ring. One important use for your flashlight is to help your camera focus. If your camera won’t auto focus due to the low light, shine your flashlight onto the subject and in many cases it provides enough light or contrast for your lens to focus. Oh yes, make sure the batteries are fresh.

Trigger release – camera shake can really mess up an image. I used to use a cable release, but have since switched to a wireless trigger. The alternative is to set you camera for a timed shutter release, but that’s a pain. Nothing in photography is cheap, but I would recommend you invest in a trigger release.

Backpack – I always put my kit in a good backpack / sling bag. Not only is it more efficient, but also keeps your kit out of sight. I prefer a backpack versus a camera bag.

Flash units – I rarely bring them for night photography, but if you are shooting people or confined spaces it may be handy. You know the drill about flash, off camera is better than on camera…. Only bring a flash unit if you specifically plan to use them. If I “think” I might use it, I leave it at home. If I “know” I will use it because it’s planned, I’ll bring them.

That’s basically it. As you can tell I haven’t gone into “how” to take a good night image, just how to plan and what to bring. Bottomline, like all endeavors worth doing right, practice, practice, practice.

Tuesday, May 26, 2009

Nice Legs!!

I mentioned in my post yesterday one piece of kit any photographer needs is a good set of legs ... I mean a good tripod. Like most things in photography the type of photos you take will point you to the right tripod for your needs. However, one bit of advice, don't be cheap. A good tripod will last for years and will help turn average images into much better photos. This is completely subjective, but expect to pay $250 or more for a full tripod.

If you take low light photography, macro or portrait photography I think a tripod is a must. Really, the only photo setting where I have not used a tripod is when I am doing my hand held street photography.

The 2 key advantages in my book to using a good tripod is 1) image sharpness is improved and 2) you can take lower ISO images in low light. To take tack sharp photos at night or in low light settings, or whenever you need to slow down your shutter speed below 1/50 of a second and don't want blur use a tripod. I've read that you can do away with a tripod if you have an uber fast lens or a good piece of glass with VR (i.e. Nikkor's 18-200mm VR). However, in my experience with low ISO even with fast glass or VR a tripod adds sharpness.

One hint, if you use a lens with vibration reduction (VR) on a tripod, turn off the VR.

I used to have a really inexpensive tripod that weighed a ton. Sure it worked, but man was it a pain. It took forever to set up and tended to drift with anything other than a prime lens mounted on my camera. It was useless and was just stupid (note, "stupid" is not a technical photographic term). I ultimately threw it away. I replaced it with a moderately priced (all in less than $300) Manfrotto component tripod. I purchased the legs and heads seperately. I would recommend that you purchase the legs seperately from the head like I did because it gives you more flexibility to select the head that matches your shooting style. Also if you need to replace a head you don't need to pitch the legs.

I purchased a Manfrotto 190XProB leg set. This is a very light weight black finished aluminum set of legs. The legs adjust with quick locking clamps and have friction tension at the head joint. It weighs almost nothing, is extremely portable, quick to set up, and handles ALL of my existing lenses up to a Tamron F/2.8 70-200mm lens. The legs can basically be set in any configuration.


Also after research and the advice of Roberts Camera I purchased 2 heads. I bought a heavy duty Manfrotto 804RC2 Basic Pan Tilt 3 way photo head. This head is used almost exclusively when I'm out at night or taking a set shot where I don't need to pan or move the camera very quickly or where I want precise settings. It's very sturdy.


For everyday use I purchased a Manfrotto 486RC2 basic ball head. This is a light weight head, and while it works fine, I'm not convinced it's right for my use. It handles all my lens, but it's a bit of a pain to adjust precisely. Also, you need to keep your hand on your lens or camera when loosing the adjustment nob. When you loosen the adjustment knob your camera free floats. Unless you have your hand on your camera or lens it will fall forward to the stops. Not very handy. However, for quick action (i.e. sports) or when you want to pan it works fine. I would rate it a solid 6 out of 10 for my use.


I keep this head on my tripod as a default. I change out to the 3-way head if I know I'm going to need precise settings. However, in hindsight I probably should have purchased a Manfrotto 322RC2, Heavy Duty Grip ball head instead of the 486RC2. This head has a handle with a quick release hand trigger. I've tried this a few times in my local photo shop and it would suit me better. Again, where did I leave that Christmas list?


Bottomline, I'm real happy with the Manfrotto kit, and I'm sure you will find there are other manufactures that make fine equipment and other Manfrotto leg / heads that will suit your specific needs. However, remember my caveat, leave your $50 WalMart tripod at home and get yourself a nice set of legs. I take mine with me all the time and they are always in the truck of my car.

If you want to check out the specs of the tripod go to www.manfrotto.com You'll find everything you need. BTW, I purchased my tripod and got good advice at the good folks at Roberts Camera in downtown Indianapolis.

OK, don't sit there reading this blog, pick up your camera, run outside and take some photos. I do!

Monday, May 25, 2009

After Dark Decisions

As you might have noticed from some of my earlier posts I enjoy going out after dark for late night photoshoots. The night brings our all types of images and photo opportunities that you don't see during the day. I've also found the colors generated from ambient light are very intense. Anyway, there's no one around to bug me, which is another benefit.

However, unlike taking photos during the day, shooting at night poses unique challenges. The lack of light and / or the excessive amount of ambient light (i.e. street lights) can make for some difficult decisions. You can get around the low light issue though a number of solutions, or combination of several. The ones I read and see most people (including yours truely) using are:
  • Tripod
  • Flash photography
  • Auto ISO
  • High ISO setting
  • Slow shutter speeds
  • Very fast lenses (with or without VR)
  • Photoshop
I went to downtown Indianapolis this past Saturday (night before the Indianapolis 500 so the downtown was HOPPING) with the goal to take multiple nighttime shots using multiple techniques. Wanted to see what works best, and of course impart upon you - my loyal readers, some tips.

First, a few comments. I am by no means an expert at photography (speaking the obvious), and my equipment is advanced amateur only, but through practice I've been able to capture some really nice images. The key is taking lots of shots testing out multiple settings. You'll ultimately find what works best for you. I think the key is to get at least 1 fast lens (F2.8 or faster) and a good tripod. My secondary recommendation is a good flash unit, although that really depends on the type of shot you want to take. I take lots of motion blur shots and a flash is not needed for this. Want to be a paparazzi, get nice flash.

The first shot was near downtown on Washington Street.
I used a tripod for this shot. For really excellent after dark photography this is your number one friend. You can subsitute the tripod with a uber fast lens with VR (vibration reduction), but your wallet will be much lighter. Don't scrimpt on the tripod. Get a good one. I use a high-quality Manfrotto leg / ball-head combination. More on tripods in a later post.

Camera settings were F/10 (to get depth of field), ISO 100 (to minimize noise), 3 second exposure, Apeture priority & spot metering. I used a Tamron 28-75mm F/2.8 lens (see earlier post), a manual cable release, and of course my tripod.

The goal of this shot was to take advantage of the ambient light behind me and over the building. I set my ISO as low as my Nikon D200 would go to minimize noise. I don't think this shot would have been possible without the tripod, slow shutter speed and low ISO. Notice how the colors are very rich and the details tack sharp.

The next shot was without a tripod. I wanted to take a few shots of people walking around town. To do this and avoid motion blur I had to either use flash or high ISO. This photo was of a young lady getting ready to head into a club.
On this shot I set my ISO at 400 and F-stop at F2.8. The larger apeture allowed me to blur the background and get the shot down to 1/45 of a second. Even with this setting I had to boost the levels a tad post processing using Photoshop (I have the older CS version).

The only ambient lighting was from street lights and lights from the club behind me. One note, I did ask if I could take her picture since I didn't want to come off like some kind of late night creep, and she just smiled. I guess that meant it was OK for me to shoot her picture.

I used a Tamron F/2.8 70-200mm lens with Apeture priority and Pattern metering. I took a few extra shots of others walking by with slower speeds and I picked up motion blur. One note, even at ISO 400 I was picking up lots of noise. It would be very hard to blow this picture up or crop it down much without the noise ruining the shot. I understand the higher end Nikons have this little problem (high ISO/low noise) solved. OK, where did I put my Christmas list?

So photo # 2, medium to high ISO, hand held, fast lens and speed just fast enough to avoid motion blur ... and of course, the gentle kiss of Photoshop.

Finally, I whipped out my trusty Nikon SB-600 flash (I know I should break down and get an SB-800 or 900, but remember I do this as a hobby and this is an expensive hobby). I also used my LumiQuest ProMax flash bounce. This time I wanted to take a few shows with higher ISO, faster speed and a flash unit.
This shot of 3 young ladies waiting outside of an Indianapolis 500 party was a good mix of flash photography, low ISO, a fast lens. All without a tripod.
The nice thing about using a flash unit is you can easily focus light and attention on your subject. By using a bounce flash unit with a defuser it avoids flash burns and red eye. No annoying blown out spots on the tips of these young ladies noses or cheeks. If I had used a flash without the LumiQuest (or similar bounce or defuser) this wouldn't have been possible. Also, we were outside on the street so there was no ceiling to bounce the flash off, so I had a defuser over my LumiQuest and the flash unit was straight on. I think it worked out well.

I was using my F/2.8 70-200mm lens at 70 mm. Apeture was set at 5.6 with ISO at 200. I manually set the speed at 1/60 of a second. I used Pattern metering. The combination allowed me to take a nice late night photo without post processing except cropping.

Photos after dark are enjoyable. However, they take practice. Try to avoid auto-ISO if you can. This is a personal preference since I find it creates way too much noice on my camera. I would recommend you get a good tripod and if the situation permits keep your ISO as low as possible. Get yourself a fast lens. A good 50mm F/1.8 is perfect for this and can be yours for under $250, or get yourself a nice flash unit.

Bottomline, practice, practice, practice. Pick up your camera, kiss your sweety goodnight and head out late at night and take some pictures. I do!

Friday, May 15, 2009

F/2.8 At Night

I decided to run downtown and take a few shots with my new Tamron SP AF 28-75mm F/2.8 lens. I described the lens in an earlier post. This is the lens I now keep on my camera versus my Nikkor 18-135mm F/3.5-5.6 G standard zoom. Thought I would give you a run down on how the lens works during a night photoshoot.

There are compromises with this lens versus its Nikkor closest cousin the AF-S 24-70 F/2.8 G ED. The one compromise is focus speed. A caveat is this was a night photoshoot so lower light often translates to slower or more challenging focusing. Even with this caveat I feel the Tamron focuses slower than all of my Nikkor lenses. Also it has a bit of an annoying sound when it focus. OK, OK, I'm nit-picking. Even with these compromises I like the Tamron as its good value for money. Remember my earlier post that cost was one of my purchasing decisions when I decided to buy this fast lens. I'll give the lens a good workout in full daylight and flash settings to see if the focus issue is across the board. I know, I can't wait either !!

All of the shots taken tonight used my tripod.

I shot a number of images through the entire 28-75mm zoom range, different apetures, and speeds. The lens worked well in all settings. All images were crisp (only out of focus or blurry when I purposely set the speed slow). The lens is smooth when adjusting focal lengths with no sticking. The zoom ring is well placed and wide enough so you don't need to look at the lens to see if you have the ring in hand. I was able to take much faster shots due to the wide F/2.8 apeture. Also, I was able to use my lowest ISO setting throughout the photoshoot, both due to the wide apeture, but also the tripod ... OK mainly due to the tripod, but the F/2.8 definitely helps.

Oh yes, one other annoying thing...I hate the Tamron lens cap. Its shaped weird, and tends to pop out of my fingers. The Nikkor style cap is uber better. I might buy a Nikkor cap as a replacement and just put some black electical tape over the name.

One other thing, I promise this is the last "other thing". It's not directly related to this lens, but I'm surprised how much value having a lens (especially in DX mode) go down to 18mm adds. Especially when you are only toting one lens like I did tonight. That extra 10mm really makes for a more flexible photoshoot. Size DOES matter.

This image was shot in apeture priority. F/9 to get deep DOF, ISO 100 and Mr. Tamron set at 40mm. Speed was 1/40 of a second.


This shot was also at apeture priority, 1/10 of a second, F/7, ISO at 100 and the lens at the end of the zoom range of 75mm. I purposely shot with motion blur. Image was converted to B&W post processing.

Overall, I give my Tamron an 8 out of 10 for night photoshoots.

Get up, get going its time to pick up your camera and shoot some pictures. I do !

Friday, May 1, 2009

Portrait Photoshoot with Mr. F/2.8 70-200mm

I had the opportunity to score a two-fer tonight. This evening at our local photo club I had a chance to use my new Tamron F/2.8 70-200mm lens during a portrait photoshoot. Not only did I get to workout my new lens, but I also borrowed one of my clubmate's PocketWizard Multimax transceiver flash triggers .... SWEET! I have never used a PocketWizard instead relying on my Nikon's built in Commander mode to trigger my flashes. Here's the PocketWizard.


The photoshoot used 3 flash units in softboxes. One on each side of our model, and one on the ground behind the model pointing slightly up.

This series of portraits used the same setting on my Nikon D200. I was in Manual mode with F/11, ISO 200, and 1/100 of a second. White balance was manually set at 5300K.


This portrait was shot at 70mm. The effects caused by the 2 softbox flashes was to give gentle light full face, and darken out our model's hair and background.


This portrait was shot at 90mm.

My general takeaways from the photoshoot were:

  1. I need lots-o-practice working on portrait photography,

  2. Its really amazing to work with a model who knows what's she's doing,

  3. The Tamron lens is 8 out of 10 after it's first hard workout. The only issue I had was the AF seemed a bit sluggish occasionally. Other than that I like it. (One lady at the photoshoot came up to me and said she had lens envy ... made my night)

  4. I like the PocketWizard, especially with a higher end flash unit (i.e. SB-800 or 900). The only downside is that they are uber expensive. Did I mention this is an expensive hobby!

Grab your camera and take pictures....I do!

Sunday, April 12, 2009

Back Alleys at Night

I've always enjoyed late night photoshoots. I find that going out well after midnight is best as most people are in for the night and the streets empty. Something about the absence of people and the vail of darkness makes for interesting shots. Using a tripod and long exposures brings out intense colors of the night.


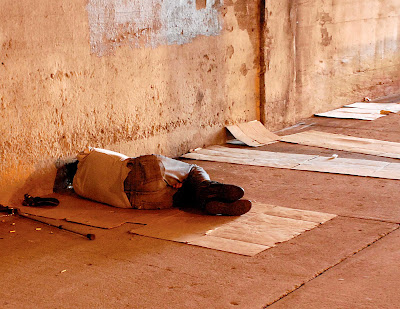
This was a hand held shot of a homeless man sleeping in an underpass. Shot with a Nikon D200 at ISO 1600, F/4.0, 1/25 speed. An 18-135mm Nikkor lense set at 31mm. Auto ISO was set on the camera.

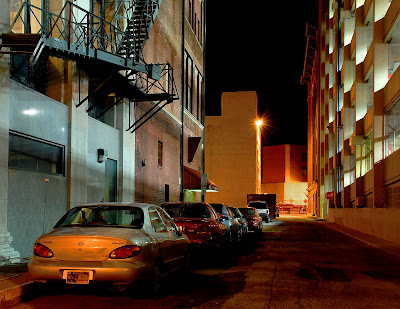
This back alley image was shot using a tripod. Nikon D200 set at F/10, ISO 100, exposure at 18 seconds. My 18-135mm lens was set at 26mm.

Another alley shot set at F/10, ISO 100 using my tripod. Exposure was set at 30 seconds. My 18-135mm lens was set at 28mm. I took several shots of the alley with different exposures. I found that 30 seconds was the sweet spot.
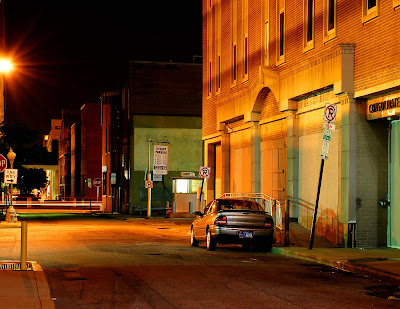
This side street shot was shot using my prime 50mm F/1.8 lens. Very speedy. I set my camera at apeture priority (as I almost always do). ISO 100, F/11, exposure at 30 seconds.
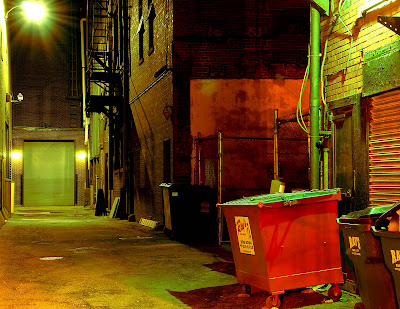
Another image where I experimented with the exposure. I settled on 30 seconds which seems to be a good mix between capturing the right nighttime mood without the ambient light becoming too overpowering. I set my Nikon D200 at F/11, ISO 100, and my 18-135mm lens set at 40mm. Like most of my late night shots I used a tripod.
NYC Black & White

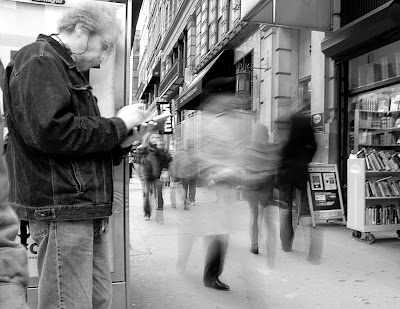
I was in New York City this past week. Decided to do a quick photoshoot of various street scenes. I started at 42nd Street at Broadway and walked down to 12th Street. The goal was to use motion blur, and attemp to catch the gritty nature of life in New York. The black and white was post processing using Photoshop channel mixer.


A bearded gentleman walking through a street market. This was shot using my 18-135mm lens set at 18mm. Nikon D200 set at apeture priority, ISO 100, F/4.
A street scene, motion blur shot outside The Strand near 12th Avenue in NYC. I was outside the store watching people walking by. There was one guy leaning against a phone booth for about 10 minutes reading a book. I focused on the guy reading the book and caught people walking by. My Nikon D200 set at apeture priority, F/11. I used a 18-135mm Nikkor lens set at 18mm. ISO at 100, speed at 1/10 of a second to get the motion blur.


It was getting late at night when I was heading back to Grand Central Station. I wanted to catch the motion blur of people walking across the street framed by headlights. A handheld shot just south of 30th street. This image was set at F/4, auto ISO of 200, 1/80th of a second. I used a Nikkor 50mm, F/1.8mm lens.