Tuesday, October 30, 2012

Film Cameras – Plastic Filmtastic 120 Debonair


As you might know I’ve developed a film camera jones.  I know it sounds crazy for a guy who is totally invested in digital equipment.  I still shoot all of my “normal” photography with digital, but use film when I want to go out to shoot for fun or when I do street photography.  Unless I’m taking a big Mamiya medium format camera out, there’s something stealthy shooting street photography with a film camera.  They tend to be quite small or unthreatening.  A Nikon DSLR with a battery grip & a honking Nikkor 24-70mm f/2.8 lens in anything but stealthy.
 
But I digress dear readers; I’ve developed a bit of a film camera addiction.  “Hello everyone, my name is Steve, and I like film cameras”.
 
I thought it would be fun to have a series of posts about some of the cameras I’ve picked up over the past several months.  Most have been purchased at a local Goodwill Outlet, at flea markets, or online.  The most expensive film camera I’ve purchased so far is the before mentioned Mamiya 645 however, all the rest are VERY inexpensive.
 
Here goes my first review.  May I introduce the Plastic Filmtastic 120Debonair.  What a name, “Debonair”.  Just has a hint of cool to it, doesn’t it?  And as the name suggests it’s almost all plastic including the lens and it shoots 120 film.  It’s a rangefinder.  Here she is:
 
Here she is along with a roll of Ilford XP2 400 which will be loaded next
I picked the camera up at the Film Photography Project Store online for only $19.99.  The store is part of the Film PhotographyProject website and podcast that I listen to regularly now.  They talked about the camera on a podcast and I said, “I must have one”, so I ordered it.  The backstory is the camera is from the 80’s (I think) and they are made in Hong Kong.  I suspect they were originally for a cheap toy or promotional give away.  The FPP purchased a boat load of them and are since selling them themselves.  I think this is the only place you can get them.
 
Anyway the camera is, how would I describe it…flimsy and plastic.  But that’s OK, it’s for fun.  It’s light leaky, and the lens tends to generate reasonable vignettes.  The lens also tends to distort the image slightly giving the photos a mild fisheye look.  The camera loads really easily, but you need to take care to make sure it’s completely closed, or see the note about light leaks.  I also put some black electrician’s tape over the back to minimize the light leaks, but that was probably not necessary.  
 
Mac & Cheese Japanese

Notice the light leak on the left side of the photos - a common theme
 The shutter release is all manual.  Very smooth.  There is no need for no stinking battery.  And the film advance is true, but you need to watch the 120 film numbers in the red film numbering window since it doesn’t stop automatically.   There’s even a hot shoe that I mounted an ancient Vivitar speedlight, and guess what it worked!
 
The “Super Lens” is a 60mm f/1.8, or so it says.  There are 3 focus settings marked on the lens and a switch for sunlight or cloudy/bulb.  I played with the settings and honestly didn’t notice much difference, but I’m sure I would need to experiment more.
 
Pretty good color but light leaks and the vignetting

Mr "M" is going to be roasted in the fire pit - not bad for no flash and past dusk
I ran a couple of rolls of 120 film through it and bottomline the camera worked great.  Is it practical for anything except for a fun “toy” camera…no, but if you want a camera to try out 120 film, here you go. 

Enjoy

Sunday, October 28, 2012

Gregory Hancock “Anthology”


I’ve shot at the Gregory HancockDance Theatre multiple times with the Indianapolis based Photo Venture CameraClub.  Gregory Hancock is a great host inviting us to shoot during their dress rehearsals.  Once again, low light, mixed stage lighting, striking colors & fast motion.  That’s right, a photographer’s fantasy land.
 
I used my standard kit for this type of photoshoot, and manual mode for all camera settings.  I brought the following (using everything):

·         Nikon D300s
·         AF-S Nikkor 50mm f/1.4G prime
·         AF-S Nikkor 24-70mm f/2.8G ED
·         A small flashlight
·         Manual cable release
·         Manfrotto tripod with a trigger handled head

Because I was shooting about 12 rows back I was able to use the widest aperture on all lenses and achieve good DOF.  As mentioned my camera was set on manual with white balance set at 4500 kelvin, speed at 1/160 second and f/1.4 on the 50mm or f/2.8 on the zooms.  ISO was varied between 800 to 3200.  ISO was the only variable all evening. All lenses are great and focus super fast even in the low light setting.  That's uber.


The nice thing about this show was that it was an “Anthology” of previous shows.  That meant multiple themes, multiple costumes, different music and different tempos.  The hardest part of the night was during several of the sets the key light was a large spot light straight over head.  Wow, it was laser beam bright.  Even at 1/160 of a second at higher ISO settings on quite a few pictures the dancers were blown out.  That was surprising, and once again it reminded me NOT to rely on the camera’s monitor only.  If you do, zoom in regularly to check where the histogram right side spikes sit.


The shoot was about 2 hours, and I was really surprised that I took about 2,400 images.  Needless to say it took hours to go through the images.  It was really a fun night for photography.
 
After shoot comments:

·         Check the histogram regularly.  If you see a spike on the far right (over exposed) then check the monitor and magnify the image to see if anything important is blown out,
·         Bring lots of memory cards.  On a photoshoot like this you will go through them quickly since you will shoot in burst mode,
·         Shoot manual ISO (or a preset).  In a setting like this the light color changes regularly.  With manual ISO or a preset it makes it easier to adjust white balance in post,
·         Bring a small flashlight.  You will need it, but cover it in your hand so you don’t wreck your night vision or affect others around you. 


Wednesday, October 24, 2012

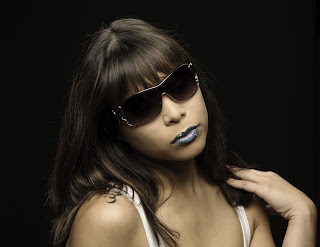
Lipstick & Sunglasses

I had the opportunity to photograph MUA, Sasha Star’s themed concept focusing on her makeup artistry.  This was a different kind of shoot for me because Sasha basically arranged everything.  I provided the photographers and the studio (M10 Studio).  Sasha did the rest.   As you might know from earlier posts, Sasha and I have worked multiple times together. Almost always I select the theme and the style for the model’s makeup.  This shoot was different because Sasha set the theme.
 
The theme was Lipstick & Makeup.  She wanted to showcase her skills by doing really wild, colorful makeup on 3 models, all wearing or not wearing sunglasses.  I knew this was going to be a challenge because these were primarily portrait headshots.  Here’s the deal - studio strobes and sunglasses don’t easily mix.  Reflection city.
 
Sasha and I agreed to a date and the basics for the studio setup.  I arranged our mutual friend, and my studio-mate Paul D’Andrea to be the second shooter.  Because this was going to be long day with 3 models, I also had studio partner, Eric Schoch to be on standby (note to self, next time tell everyone that another photographer will be there).  Sasha asked that both a white and black seamless background be set up.  No problems.  
 
Model: Cory

Model: Cory
Models Mina Vee, Aubrey Carr (“Cory”) and Korey Gonzalez were lined up.  I’ve photographed both Mina & Cory before, and I saw Korey earlier in a wedding fashion show.  I knew they were going to be pros.  Of course, as I mentioned I already knew the skills Sasha would bring.
 
Model: Mina Vee

Model: Mina Vee
Game day, everyone except me arrived on time.  I called Paul early in the morning and asked him to set up, since I thought I would be late.  I arrived after Paul had set up a portrait lighting clamshell and the models were getting made up.  I quickly got busy.  
 
Against the black backdrop Paul had set up an Elinchrom Rotalux Softbox strip light for the bottom of the clamshell and an Elinchrom beauty dish for the top.  Also, behind 2 “V”-shaped wooden “barn doors” he had placed studio lights to high-key the background.  Everything was triggered with Elinchrom Universal triggers.  The strip light was placed right under the model’s chest or knees depending upon the look and the beauty dish at a 45 degree + angle over the model’s head.  We wanted the lighting spot on so we took multiple readings with our Sekonic light meters.  
 
Lighting setup at M10 Studio.  Nearest is the white seamless with model Mina
Against the black backdrop we used an Elinchrom Rotalux softbox as the key light, another strip light for the hair light and a silver reflector to bounce light under the chin.  We had these 2 setups going all afternoon.
 
Lighting setup against the white seamless - Cory & Paul
Sasha’s plan was to makeup each model twice with different looks, and to photograph each model against both a black and a white background with and without sunglasses.  Paul, Eric and I moved between setups and tried to keep the process smooth.  However, with that many people and so much equipment it does get tight.  No problems, most of us have worked together before so we did OK.  Also, all 3 photographers use Nikon equipment and mainly Elinchrom lighting, modifiers and triggers, so we were able to move between equipment easily.  
 
Model: Korey

Model: Korey
I shot with my AF-S Nikkor 70-200mm f/2.8G ED VR II and my AF-S Nikkor 24-70mm f/2.8G ED lenses.  Paul did the same.  Eric broke out his prime lenses along with really sharp macro lens that worked great for close-ups.  All images were shot in manual mode with ISO the only constant at 200.  We adjusted f/stop & speed as determined by the light meter, but normally kept the aperture wider than f/5.6 – 6.3.
 
Overall, a good session with some really great shots.  The only post processing I had to do was to tone down the reflection in the sunglasses.  The makeup & therefore the skin was so well done that almost no processing was required on the skin.  
 
Post photoshoot thoughts:

·         Keep the organizer of the shoot informed of everyone who is going to be there.  In this case I had forgotten to tell her that I had invited Eric, and honestly I thought they had met before which they hadn’t

·         Figure out a way to angle the lights or the sunglasses to minimize reflection.  I did play around with this, but honestly it looked worse in post than it did in camera.  I would say a good 25% of the shots with sunglasses were unusable.

·         Get the images processed quickly.  If the shoot is for someone else I try to process the images quickly.  The faster the better.

·         In a studio setting a light meter is a handy tool.  It’s not required with today’s DSLR’s but it really helps you nail the lighting

Thursday, October 4, 2012

Anthology by Gregory Hancock

Another quickly blog post about tonight's Indianapolis Photo Venture Camera Club Meetup.  Tonight we went to the Gregory Hancock Dance Theatre dress rehearsal of Anthology.  It's a nice mix of dance, music, light and motion featuring various segments from past shows.  It was extremely good, like all the other Gregory Hancock events that I've gone to and photographed.
 
Gregory is a really good host and has routinely let the club shoot during the dress rehearsals.  The Tarkington at the Center for the Performing Art is a perfect venue for the Dance Theatre and for low light photography.  If you haven't gone, you should.  The normal show is October 5 & 6, 2012
 
I'll post photos and camera settings after I process the images.  In the meantime here's a panorama of the club during one of the intermissions.
 
Panorama shot with an iPhone 4s with iOS6
 

October Creative Meetup

Went to Travis Little's October Creative Meetup (Artist Gathering) at the End Of The Line in Fountain Square.  I had hoped to stay the evening and chat with friends and introduce myself to others that I wanted to meet, but I had to leave after about 45 minutes.  No problems I still got to chat with Dean Scott & Paul D'Andrea.  Also another photographer (name escapes me) who shoots medium format film ... nice.
 
Anyway, one of the things I had planned to do was to photograph the participants with the cameras I mentioned in yesterday's blog post.  I did have time to shoot about 6 photos with my Filmtastic Debonair and a couple of Polaroids. 
 
The Polaroid Colorpack III worked great with Fujifilm FP-100C & a flashcube. 
 
The Polaroid Spirit 600 also worked well with an expired pack of Polaroid 600.  The images are a not that rich, but for a pack that is expired, I'm just glad the battery had juice to fire off the images. 
 
A short, but fun night talking with several people about photography!  I could do that ALL NIGHT.

Wednesday, October 3, 2012

All Plastic

Just a quicky post tonight.  Tomorrow evening after work I'm going to a local Artist Meetup in Indianapolis to meet with and chat up a large group of artist and creative types.  You know your painters, models, makeup artists, photographers.  Your basic right side brainers.
 
Anyway, what I've done the last couple of meetups is bring a few Polaroid cameras, and popping off a few shots.  Most of the time people look at me like I have 3 eyes, but some get a giggle out of it.   I almost always shoot digital in studio and for my "real" photography, but I've been shooting film just for fun and for street photography. 
 
Here's what I'm bringing to this month's Meetup.  You have a Polaroid Colorpack III that I blogged about yesterday, a Polaroid Spirit 600, and a Plastic Fantastic 120 Debonair.  The Debonair is toting a Vivitar 3700 that I picked up at Goodwill.  Oh yes I am also bringing a box of Flashcubes for the Colorpack.
 
The Colorpack will be shooting some new Fujifilm FP-3000c, the Spirit 600 a couple of packs of expired Polaroid 600 (fingers crossed that the batteries are still good) and the Debonair a 120 roll of Kodak Portra.  Should get some interesting photos.
 
And here are the my plastic wonders:


Monday, October 1, 2012

The Polaroid Colorpack III

I know this is going to sound crazy coming from a digital photographer, but recently I've started to get back into film photography.  Think of it as a hobby within my obsession.  It started about a year ago when on a whim I picked up a Mamiya M645 from eBay.  This is an all manual 120mm medium format film camera.  I've ended up shooting a number of rolls through this camera with great success. 
 
Around the same time I stopped by a local Goodwill Outlet and found that on occassion they had old film cameras & instant film Polaroids that people had donated.  I've been stopping by a couple of times a month and since then have picked up 28 film cameras.
 
One of the cameras that I've enjoyed playing with is the Polaroid Colorpack III.  This is an older "Land Camera".  You know the type that when you shoot a photo, you "pull" the film out the back of the camera.  There is absolutely nothing automatic about this camera.  It's 100% manual.
 
Polaroid Colorpack III Land Camera, a box of FujiFilm FP-3000b & a shot in my office using a Flash Cube
The nice thing about the camera is that you can still buy film for it.  Fuji makes a line of instant film the Fujifilm FP-100c and the Fujifilm FP-3000b.  The first is a 100 ASA (similar to a digital ISO) color film and the other a 3000 ASA black & white film. 
 
I've shot about 1/2 dozen packs through this camera, and the photos are great.  Very 60's-70's vibe.  The challenge is that you have to remember to set the ASA switch on the camera when you put in the film, and you have to play with the Darken/Lighten dial to get the right setting.  It's basically trial and error.  Another thing that's fun is that the camera takes Flash Cubes.  I bought about 5 packs of Flash Cubes on eBay, and they work fine. 
 
Essentially, all you do with this camera is turn the focus ring on the lens to the distance to your subject (you basically guess), you set the darken / lighten dial to the right setting (normally I set it slightly darken), compose your image through the viewfinder, and push the shutter release.  You then pull the film tab on the back of the camera to extract the photo.  You wait the proper amount of time (normally less than 30 seconds) and peel the image from the backing paper.  And there you go.
 
If you find one of these cameras at a flea market or garage sale the main thing you need to check is if the battery compartment (inside the camera near the front of the lens box) has limited to no corrosion.  If not, you simply put in 2 AA batteries and you are good to go.  I've been lucky, both of the Polaroid Colorpack cameras I've found have worked great.
 
Here are a couple of scanned Polaroids from this past weekend's photo exhibit by Mike Arledge at Petrov Frame & Restoring.  No hipster iPhone app on these Polaroids, it's all retro goodness.
 
Photographer Mike Arledge shot with FujiFilm FP-100C
Our host & shop owner, Anatoly Petrov shot with FujiFilm FP-3000C